- Get link
- X
- Other Apps
- Get link
- X
- Other Apps
In this article I would like to show you how to install Tensorflow and Keras with NVIDIA GPU to process your Deep Learning model. This article written based on my own experience and success to install them. I had a difficulties while installing Tensorflow and Keras With NVIDIA CUDA and got the errors which made headache. That was happen because I took a wrong step to install NVIDIA CUDA library separately from external link which is https://developer.nvidia.com/cuda-downloads. I had just relized that if we are using Anaconda, it already provide NVIDIA CUDA Toolkit by calling the "conda" command and just wait the process and all will get done successfully to develop your own Deep Learning model using python. So, I hope that if you have read this article, this can help you to cure your headache and do the right way to install Tensorflow and Keras with GPU NVIDIA CUDA support on Windows 10.
Below my PC specifications :
Below my PC specifications :
- CPU : AMD Ryzen 3 2200 G 3.8 GHz overclocked
- RAM : 2x4 GB DDR4 2400MHz
- GPU : Zotac NVIDIA 1050Ti 4GB GDDR5
- OS : Windows 10 64bit Home Edition
- Python version : 3.6
I. Install Tensorflow GPU using Anaconda Online Repositories
In this section we need to install Tensorflow GPU library first from Anaconda cloud repositories. Just open your Anaconda Command Prompt and some cases you need to run it "As Administrator". Assume that you have activated your anaconda environment. If not, you can read my article about "How to Install Anaconda and Create Python Environment".
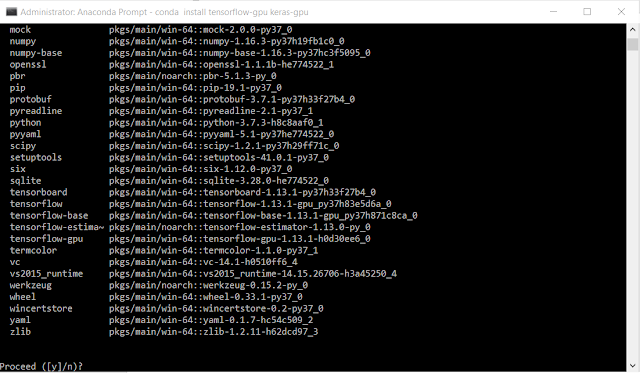
Then begin to install Tensorflow library with GPU support using Conda command :
(environment_name) C:\Users\yourname>conda install tensorflow-gpu keras-gpu
Just follow the instructions on your Anaconda Prompt and make sure that you are connected to the internet fastly and you do not get any errors.
Picture 1. Preparing install Tensorflow GPU and Keras GPU Using Conda
(environment_name) C:\Users\yourname>conda install -c anaconda cudatoolkit
(environment_name) C:\Users\yourname>conda install -c anaconda cudnn
That is all! If you do not receive any errors then your Tensorflow + Keras GPU ready to process your Python Deep Learning model.
II. Check your Tensorflow GPU is Working
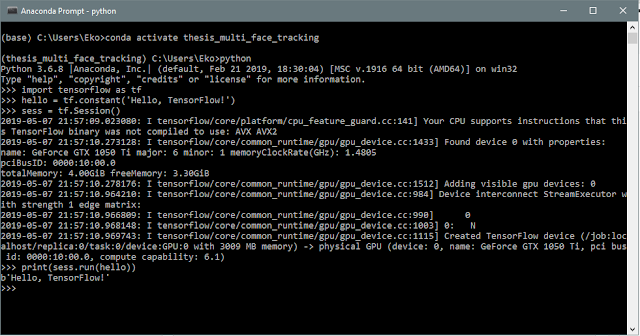
To make sure your conda environment is ready to be used, you can start a simple python code to test whether the Tensorflow session can be called or not. Just type python on your Anaconda Prompt and you can start to type below python codes :
II. Check your Tensorflow GPU is Working
To make sure your conda environment is ready to be used, you can start a simple python code to test whether the Tensorflow session can be called or not. Just type python on your Anaconda Prompt and you can start to type below python codes :
>>> import tensorflow as tf
>>> hello = tf.constant('Hello, TensorFlow!')
>>> sess = tf.Session()
>>> print(sess.run(hello))
Above codes will call a tensorflow library and save the string data on tensorflow session in a variable called hello. After that, hello will be called to print a string from tensorflow session. If your tensorflow session can be called successfully without any error or warning message, then your output will shown like this below picture :
Picture 2. Result of Tensorflow in Python Simple Program
Above picture explains us that Tensorflow has detected a GPU devices called GeForce GTX 1050 TI and it starts to run tensorflow using GPU.
That is all my article about how to install tensorflow and keras with GPU support to make a deep learning model.
Hope this helps.
anaconda
cnn
conda
cuda
deeplearning
machinelearning
nvidia
pip
programming
python
tensorflow
tips
tutorial
windows10
Location:
Jakarta, Indonesia
- Get link
- X
- Other Apps


Comments
Post a Comment
Please leave your comment politely and do not write a spam message.
Thank you. :)